Beginner Cute Simple Mehndi Designs For Front Hand
Mehndi is a worldwide art with centuries-old roots. It is used to adorn hands and body parts with stunning, temporary tattoos. Designs vary based on the region or culture.
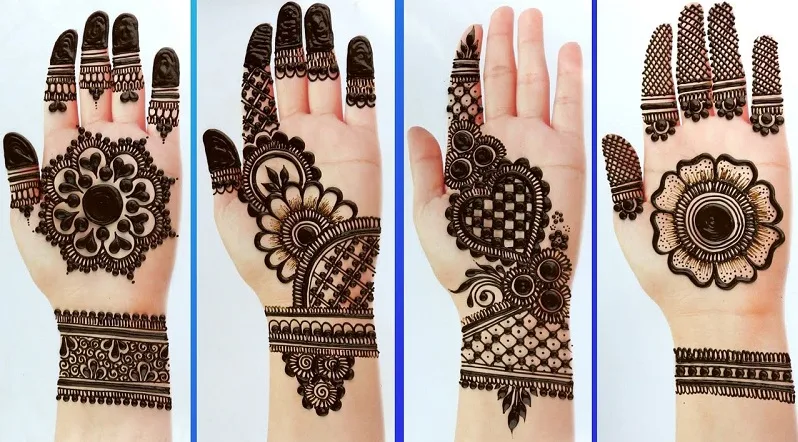
Are you a mehndi beginner? Or seeking inspiration? Here are a few front-hand designs. They’re easy to replicate and beautiful. Features include: chequered patterns, floral elements, lines, and dots. Motifs range from basic to bold. There’s something for everyone who wants lovely henna art on their hands.
Simple Dot and Circle Mehndi Design
A simple dot and circle mehndi design is ideal for beginners. It’s a piece of cake to master and lets you explore the possibilities of mehndi with a basic yet pretty design. It’s perfect for front hands and any special occasion.
Let us now take a peek at how to create this cute mehndi design:
Steps to Follow
Mehndi is an art form popular among South Asians. It involves intricate designs on body parts, like hands and feet, with henna paste. This art has become popular around the world. Beginners can create beautiful designs with practice!
Follow these steps to make a dot-and-circle mehndi design:
- Draw two circles – one in the center of the palm and one near the wrist.
- Connect them with vertical lines evenly spaced.
- Draw dots within the circles using a black marker or kohl eyeliner stick. Space them evenly.
- Extend some dots outside the circles, connecting them around both.
- Fill in/shade within the lines with light brown/red henna paste, using an applicator like cotton swab or beads. Don’t overapply.
- When it dries, show off your design! Practice till perfect.
Floral Mehndi Design
Floral mehndi designs? Timeless and classic! Whether you’re a mehndi beginner or an experienced artist, a floral design looks beautiful on the front of your hands. From simple rose to intricate vines, there’s a range of floral mehndi designs to explore. Time to learn more about these gorgeous designs!
Steps to Follow
Mehndi, also known as henna design, is an old form of art. It comes from India, and its neighbouring countries. Professional mehndi designs can be expensive, but it is possible to do it yourself. Here are the steps to make a simple floral mehndi design:
- Pick a few flower motifs for your design. You can find designs online or in books.
- Trace the flowers onto transparent paper with a black ink pen or white chalk.
- Make sure all lines and details are sharp and clear. This will help you work faster.
- Mix henna powder with lemon juice and let it sit overnight. Add tea glucose/ corn syrup/ coconut oil.
- Put the henna paste into an applicator bottle.
- Put on a nitrile glove before starting.
- Draw the outline with the applicator bottle.
- Fill in the inner part slowly.
- Let the henna paste dry, then brush off the particles.
- Optional: Rub powdered sugar over the design to darken the colour.
Paisley Mehndi Design
Paisley Mehndi Designs are ideal for those new to the art. They are very easy and pleasing to the eye. An excellent way to practice drawing, perfect your skills, and have fun!
Below, we will explore some of the most loved Paisley Mehndi Designs for the front of the hand:
Steps to Follow
Paisley mehndi designs are classic Indian body art. They mix intricate shapes, bright swirls, and delicate natural layouts. It needs skill with both fine and bold lines.
To make one, here’s what to do:
- Draw the design on paper, or apply it to skin with a pencil or liquid eye liner.
- Add details using small dots and strokes. Start from the middle and work outwards.
- Fill in shapes with henna paste using a fine kolah or an eyeliner brush.
- Leave the paste on long enough for it to seep into the skin.
- Remove excess henna paste, then rinse off with cold water. The colour usually takes 24-72 hours to appear, depending on skin type and aftercare.
Leaf Mehndi Design
Leaf Mehndi designs are a great choice! They look amazing and are not too hard to make. Follow our tutorial and you’ll be an expert in no time.
Here are the steps you need to take to get that perfect design:
- Firstly, let’s get started!
Steps to Follow
Leaf mehndi design is a great way to decorate your front hand for special occasions. It requires basic techniques and can create stunning art in minutes. You need a decent mehndi cone and practice. Follow these steps:
- Start with an outline for the leaf pattern. Draw two parallel lines with a mehndi cone, leaving some distance between them.
- Create petal-like shapes along these two lines. Take care not to overlap them and apply pressure for a darker hue.
- For rosebud-like designs, draw curved lines around the outlines and connect the endpoints. This creates depth. Try 7 petal leaves if wearing traditional attire.
- Add texture with dots and connect wings for symmetrical effects. Add border patterns at corners for frame aesthetics.
- Repeat on the other side and wrap up with glitter/gem placement depending on the occasion.
Heart Mehndi Design
Mehndi designs are a popular form of body art in many cultures, particularly in India. If you’re a beginner, the Heart Mehndi Design is the best one to try. It’s simple and beautiful! You can easily adapt it for a variety of looks. Let’s check out the Heart Mehndi Design.
Steps to Follow
Heart mehndi designs are perfect for both amateurs and experienced mehndi artists. They suit any event, from weddings to festivals. Trying out heart mehndi can be fun and rewarding! Here are some tips to help you start:
- Get ready: Make sure your hands and feet are clean and dry. Apply an antiseptic lotion like alcohol or tea tree oil to the skin before applying the henna paste. This will help the mehndi stick.
- Outline the shape: Use a fine-tipped pen to draw the heart shape on paper. Mix henna powder with water to make the paste.
- Fill it in: Use an applicator cone to fill in the open areas of each heart. Go slow to get the perfect shape.
- Let it dry: Leave it to dry for at least 6-8 hours. Then carefully peel off the clingfilm or wax paper without disrupting the mehendi lines.
Conclusion
No wonder mehndi is so popular! It’s both affordable and gorgeous. To make stunning designs, remember: practice is key. With some practice and patience, anyone can be an expert at mehndi. The designs can go on feet, hands, arms, back, or any part of the body.
This guide can give you some one-of-a-kind ideas for your own mehndi design!
Frequently Asked Questions
Q: What are some beginner cute simple mehndi designs for front hand?
A: Some beginner cute simple mehndi designs for front hand include floral patterns, mandalas, dots and lines, and Arabic designs.
Q: How long do these mehndi designs last?
A: It typically depends on how often the hands are washed and how much the hands are exposed to water, but mehndi designs can last anywhere from 1-3 weeks.
Q: What type of mehndi should be used for these designs?
A: Natural henna is the best type of mehndi to use for these designs. It is safe, non-toxic, and provides the best stain for the design.
Q: Is it necessary to hire a professional artist for these designs?
A: No, these designs can be done at home by beginners. However, if you want a more intricate or complicated design, it may be helpful to hire a professional artist.
Q: Are there any tips for beginners when doing these designs?
A: Yes, it is important to practice on a paper first, make sure the mehndi is not too runny, and be patient with the application process.
Q: Can these designs be done on other parts of the body?
A: Yes, these designs can be done on other parts of the body such as feet, arms, and back. However, they may require more skill and practice.

- Fentanyl Vaccine Breakthrough: Scripps Research Develops Shot That Blocks Deadly Overdoses Before They Reach the Brain - June 13, 2026
- Nipah Virus Returns to Kerala — First Case of 2026 Confirmed, State Declares High Alert - June 12, 2026
- Jill Biden Reveals She Wanted to Keep PM Modi’s 7.5-Carat Diamond Gift but Returned It After State Department Valued It at $20,000 - June 8, 2026